Wednesday, May 15, 2013

Essential C4D & AE Plugins

This is a working list, and I'll update it as I discover new plugins I use regularly.

Cinema 4D

Free
Paid


After Effects

Free
  • DuIK Tools: Inverse Kinematics for After Effects
Paid
  • Reel Smart Motion Blur: Quickly add motion blur to your 3D animations in post. Yes, there are free workarounds, but the quality (and mostly the speed) of this plugin make it a must-buy.

Wednesday, April 24, 2013

How to subscribe to RSS feeds using TheOldReader.com and Google Chrome

Why I Switched to TheOldReader.com

When Google announced that they would be phasing out Google Reader, I was more than a little disappointed. I loved the Google Reader experience - it's how I keep abreast of the latest animation techniques and also how I stay up-to-date with job postings without having to manually search for updates. After about a month of denial where I continued to use Google Reader, I am now making the transition to my new RSS Reader TheOldReader.com. I selected TheOldReader.com because they offer the closest experience to what I was used to in Google Reader: a clean but bare-bones reader that minimizes distraction.

Subscribing to Feeds in Google Chrome


  1. Install the GoogleChrome RSS Subscription Extension (By Google)
  2. Add TheOldReader.com as your default RSS Reader
    1. Go into your extension settings (file pull down (looks like three horizontal bars) -> Tools -> Extensions
    2. Open the RSS Subscription Extension Options (Scroll to RSS Subscription Extension and click on the small blue options link)
    3. Click on the "Add..." button to add a new feed reader
    4. In the "Description" field enter: The Old Reader
    5. In the url field enter: http://theoldreader.com/feeds/subscribe?url=%s
    6. Choose save
    7. Select The Old Reader, and choose "Make Default"
    8. Turn on "Always use my default reader when subscribing to feeds."
  3. Browse to a page with an RSS
  4. Click on the orange RSS icon that shows up in your URL bar to subscribe

Monday, February 18, 2013

WTF: No, seriously, What The Font?!

If you want to know what font a client is using in their project, consider: What The Font.

Just upload an image and using their crazy robots and powers of typographic delight, they will tell you what font is in that image. The world amazes me. Special thanks to sender-inner R. Blaik.

Thursday, February 7, 2013

My Cinema 4D Rendering Course is now available on Lynda.com

I've been working with the incredibly talented people of Lynda.com for a while now to put together a course that I feel is an approachable and thorough introduction to many of Cinema 4D's advanced rendering tools and techniques. I'm really proud of what we've been able to accomplish and I encourage you to take a look.

Production Rendering Techniques in Cinema 4D with Donovan Keith

If you have any questions/comments/concerns I'd also love to hear them as I want to make resources that are useful to you.

Friday, February 1, 2013

Wednesday, January 30, 2013

WeekDailyDesign #002 Hemingway

Wow, this is awful, but I had less time to work on this than anticipated - I need to budget better for this project.

Tuesday, January 29, 2013

Weekday Design #001 Plotz

Exercise: illustrate the Dictionary.com word of the day using only standard fonts and simple manipulation of black/white characters.

WeekDaily Design #000


Monday, December 10, 2012

Maker Spaces in Los Angeles

Apartment living can make it difficult to take up multiple hobbies, limited space can prevent you from keeping all of the needed tools and supplies for something like painting, let-alone woodworking. Thankfully, there are some organizations that are dedicated to providing spaces for people to make, well... stuff.

Tuesday, December 4, 2012

Cleaning up a .3DS Import in Cinema 4D


After importing an object from the internet, you'll often want to clean it up. The following is a good general procedure to follow.
  1. Select all objects (Command/Ctrl + A)
  2. Go into Polygon Mode
  3. Rt-Click > Optimize
  4. Rt-Click > Untriangulate
  5. Object Manager > Tags > Cinema 4D Tags > Phong
  6. Turn on Angle Limit | Attributes Manager > Angle Limit
  7. Tweak the Angle Limit until hard edges are hard and soft curves are soft.
  8. Rename the elements so that the names make sense.
  9. Tweak the axis positions so that they are logical.
  10. Adjust the hierarchy so that it makes sense and the object is easy to manipulate.
  11. Adjust the scale of your object so that it matches a real-world counterpart.
  12. Apply Materials that look good from the C4D content library, or of your own creation.
  13. Save the object to your personal library folder with a descriptive name. File > Save Project with Assets...

Tuesday, November 27, 2012

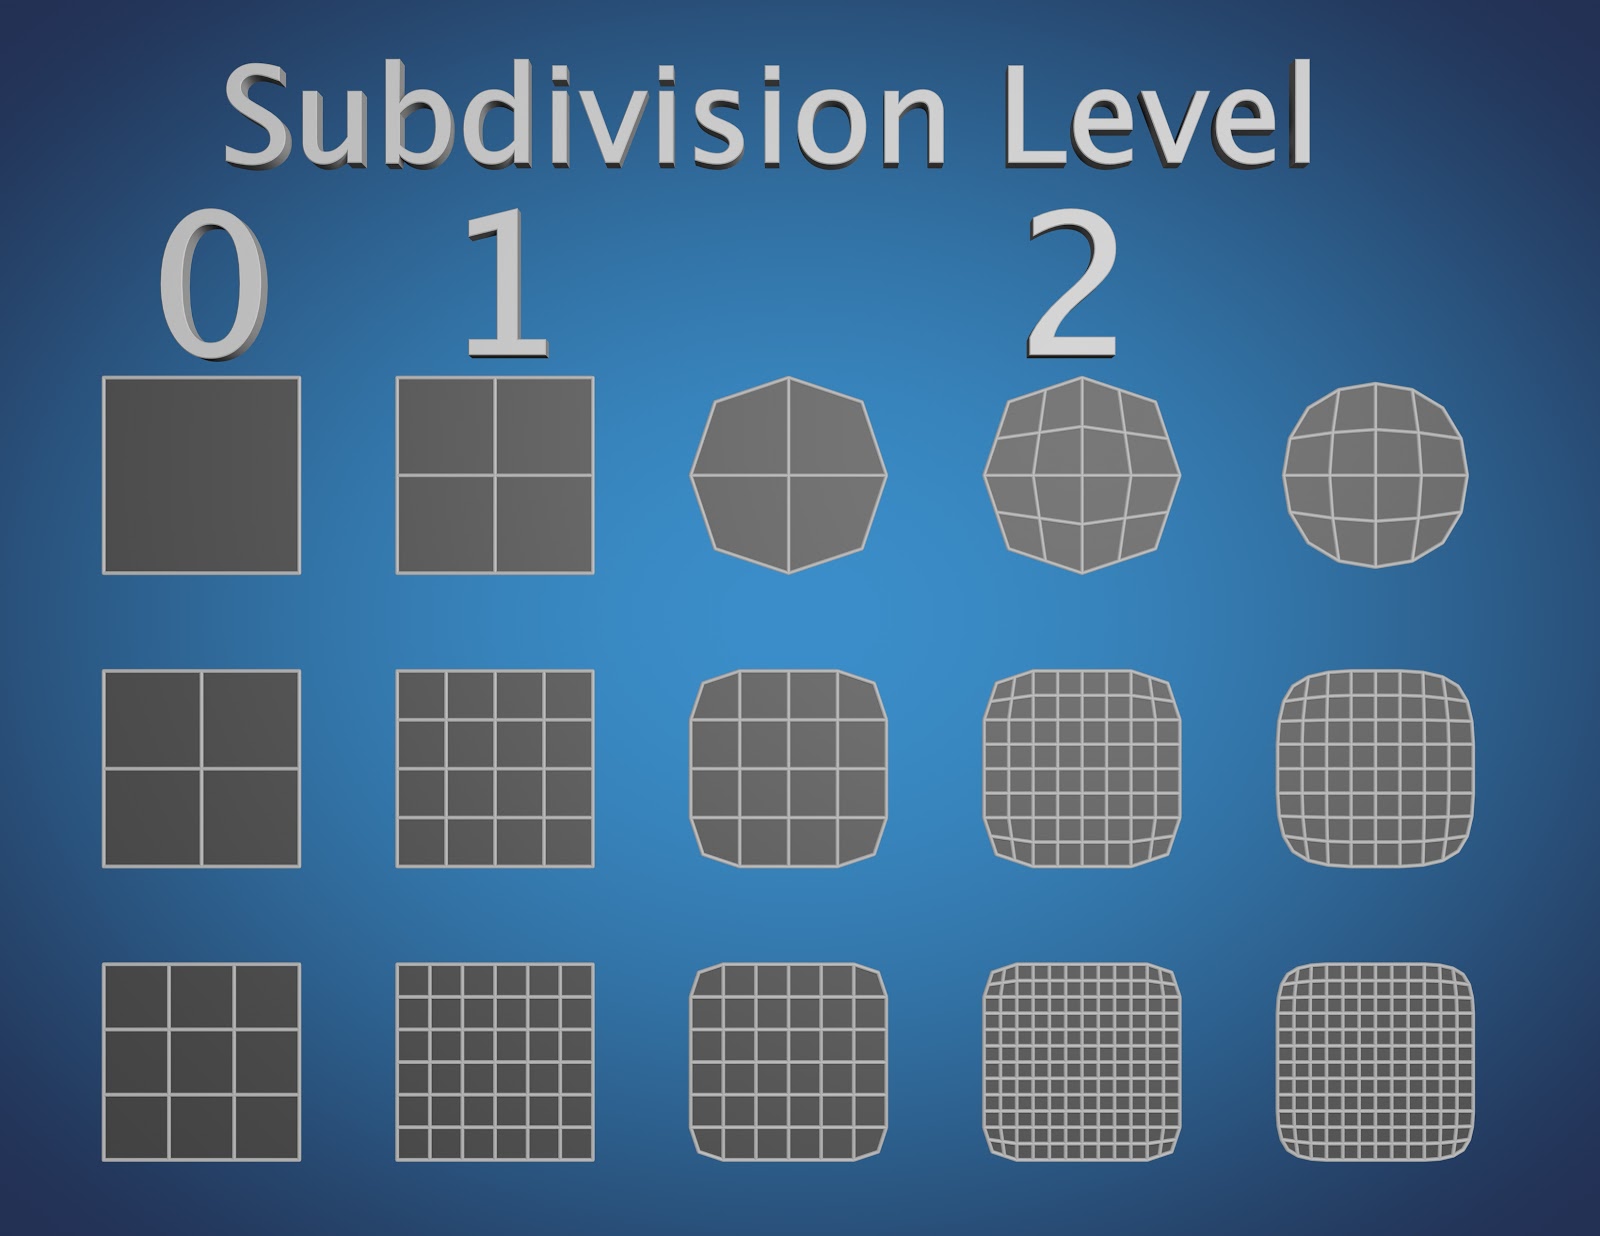
How Do Subdivision Surfaces Work?

This is an article I hope to write at some point, but for now, here are some pictures at a printable resolution...
Stages of subdivision.

Common methods for (trying to) sharpen corners.


Methods for sharpening edges. Some more successful than others.

New C4D Plugin Programming Blog

Some of the Cinema 4D programmers are now writing a Cinema 4D plugin programming blog in their personal time. It looks  like a great resource for any aspiring (and current) plugin programmers.


C4D Programming is written by Frank Willeke, Yannick Puech, and Francesco Guazzi.

Thanks guys!

Friday, November 2, 2012

How to Make Your Own Puppets

The good times keep on rolling here at Nerding Off. Another flash-from-the-past for you, Jim Henson shows you how to create your very own puppets at home!


How Terry Gilliam Made the Animations for Monty Python

Ever wondered how Terry Gilliam created the hilarious animated interstitials for Monty Python's Flying Circus? Well, wonder no longer:


My takeaways:

  • The primary method is cut-out animation. Not unlike the early days of South Park.
  • He got his images from magazines, historical sources, books, and some elements which were custom shot.
  • Most elements require at least two pieces, one with just the moving element, and one with the moving element seamlessly painted out of the background.
  • Embrace the limitations of the medium: motions should be quick, don't select elements that will force you do do a bunch of complex animation (wheels are better than legs).
  • Photographs lend a dimensionality to what would otherwise be an incredibly flat medium.
  • You can recolor BW photos using felt-tip pens.
  • Use a loop of tape to pin down pieces.
  • Use a piece of glass to flatten out the pieces and minimize shadows. Try to light from directly above using 2 lights. The higher the light the better (to mimimize shadows).
  • Have fun!

Wednesday, October 31, 2012

How to Easily Transcribe Audio

After a bit of research I've discovered that for me, the best free audio transcription software is Express Scribe by NCH Software, you can download it here.

1. Optimize your playback hotkeys
To get the most out of your experience, I recommend the following hotkey settings (Options > System-Wide Hotkeys):

Having the key-commands so close at hand basically eliminates the need for a foot pedal.

2. Slow down the default playback speed
Also, when playing back your audio, set the playback speed to something like 50%:

3. Automate the time-stamping process
If it's important that you be able to time-stamp your audio, add the "Copy Time" command to your list of hotkeys (details here). This will automatically make a copy of the current timestamp, using the key commands I have listed above you would use "Ctrl + Num 0" followed by "Ctrl + V" to paste in the time stamp.

Also, to change the format of the pasted timestamp, I recommend the following settings:


Note, you can't see it, but after the suffix brace is a space " ".

This makes the finished time code looks like this:
[00:01:23.4] He said this.

Notes for the software developer:
My primary niggle with the program is that I can't use the same command for play and stop. If that was possible, I'd recommend "Ctrl+Space" as the hotkey so that your hands never have to leave the home position.

Also, it would be great if the software could combine "Copy Time" and "Paste" into a single command, but for a free software this is already worlds better than trying to transcribe in MS Word. 

Monday, October 29, 2012

Experiment #2: Isometric Cubism

A quick experiment in digital cubism. Can a subject be defined simultaneously from three angles? Does this reveal or obscure form?

Experiment #2: Isometric Photo-Based Cubism from Donovan Keith on Vimeo.

Friday, October 26, 2012

Experiment #01: Cosmos

In an effort to keep up my chops in between projects I've programmed a random design assignment generator. Today's assignment was "Create a design using only circles."

I initially created the following in Illustrator:


Then translated the concept to C4D and eventually After Effects:

Here's the finished animation:


Tuesday, October 2, 2012

CG Lighting Tutorials and Resources

This post mainly exists so that I can compile all of the lighting resources I find into one meaningful location, but hopefully it will be of some use to you as well.

Richard On, whose work really speaks for itself, has compiled a four-part series on lighting:
mister3d has compiled a lively discussion from the CG Talk Lighting & Shaders forum into a useful primer on the science of CG with a focus on the physics of light and how it is typically represented by 3D programs.

Jeremy Birn who currently works as a lighting TD at Pixar has written the book on CG Lighting: "Digital Lighting and Rendering".

Kodak has written a newsletter that is a good introduction to the basics of lighting for film.

Articles & Interviews with working professionals:
Key Tips for Lighting by Cosku Turhan (Sony Pictures Imageworks)
New Trends in CG Lighting Matthias Menz (Weta)

Friday, September 14, 2012

Syncing Multiple Copies of Cinema 4D (Windows)

If you're an animator working in the modern era, you're probably running Cinema 4D in at least three places.
  1. Your desktop at work.
  2. Your desktop at home.
  3. Your laptop.
Add to this that on any of these machines you may be running the current version of Cinema and the version or two before that (for legacy projects/clients), and you've pretty much guaranteed that any time-saving scripts, plugins, layouts, or libraries won't be where you need them when you need them.

Thankfully, there's a solution, that would probably have been obvious to any hardcore unix hacker (which I'm not, nor I assume are you): symbolic links.

A symbolic link is basically a shortcut from one folder or file to another, except that your file browser and any programs you're running can treat them like real files.

The basic solution works like this.

The three lower arrows each represent a symbolic link to a "C4DLibrary" folder in your DropBox (or GoogleDrive, or iCloud, etc) account. Dropbox will handle the work of keeping your files synced across computers, and whenever you add a new plugin/layout, etc, it will get saved to the C4DLibrary folder in your dropbox.

Instructions

Note: the following instructions apply only to a Windows machine. These instructions also should only be used with the same version number of C4D, cross-version linking can lead to strange results - you'll need to manually link sub-folders.
  1. In Dropbox create a folder called "C4DSync" (This is the "C4D Library" folder from the above illustration)
  2. Download "Directory Linker" from: http://dirlinker.codeplex.com/
  3. Open Cinema 4D on the most readily accessible computer.
  4. Click on Edit->Preferences
  5. From the preferences window click on the "Open Preferences Folder" button. This will open a windows explorer dialog.
  6. In the path bar at the top (the one that looks like Username->AppData->Roaming->MAXON->...), click to the far right. This will convert the path to a file path that should look something like:
    C:\Users\Username\AppData\Roaming\MAXON\CINEMA 4D R13
  7. Copy this text.
  8. Run the "Directory Linker" application you downloaded earlier.
  9. In the "Link Location:" field paste the filepath you copied in step 6.
  10. In the "Link To:" field browse to the "C4DSync" directory you created in dropbox. It'll probably look something like "C:\Users\Username\Dropbox\Library\C4DSync"
  11. Ensure that "Copy contents to target then delete it" is active.
  12. Click on the Go! button.
Congratulations, your primary installation of Cinema 4D is now saving all preferences and plugins to your dropbox folder. Now just repeat steps 2-12 for all other C4D installations.

WARNING: Please make backups of your preferences folders before doing this, especially if you have any important projects in there. I've yet to test this with C4D running simultaneously in multiple locations, but I can imagine that leading to some bad juju, so please test (and report back) before using this in production. Also, if your plugins are serial-linked this will lead to some issues as well unless all versions of C4D are sharing the same serial number.

References

Thanks go to the following resources for getting me to a place where I was able to write this post: