Monday, December 10, 2012
Maker Spaces in Los Angeles
Apartment living can make it difficult to take up multiple hobbies, limited space can prevent you from keeping all of the needed tools and supplies for something like painting, let-alone woodworking. Thankfully, there are some organizations that are dedicated to providing spaces for people to make, well... stuff.
Tuesday, December 4, 2012
Cleaning up a .3DS Import in Cinema 4D
After importing an object from the internet, you'll often want to clean it up. The following is a good general procedure to follow.
- Select all objects (Command/Ctrl + A)
- Go into Polygon Mode
- Rt-Click > Optimize
- Rt-Click > Untriangulate
- Object Manager > Tags > Cinema 4D Tags > Phong
- Turn on Angle Limit | Attributes Manager > Angle Limit
- Tweak the Angle Limit until hard edges are hard and soft curves are soft.
- Rename the elements so that the names make sense.
- Tweak the axis positions so that they are logical.
- Adjust the hierarchy so that it makes sense and the object is easy to manipulate.
- Adjust the scale of your object so that it matches a real-world counterpart.
- Apply Materials that look good from the C4D content library, or of your own creation.
- Save the object to your personal library folder with a descriptive name. File > Save Project with Assets...
Tuesday, November 27, 2012
How Do Subdivision Surfaces Work?
This is an article I hope to write at some point, but for now, here are some pictures at a printable resolution...
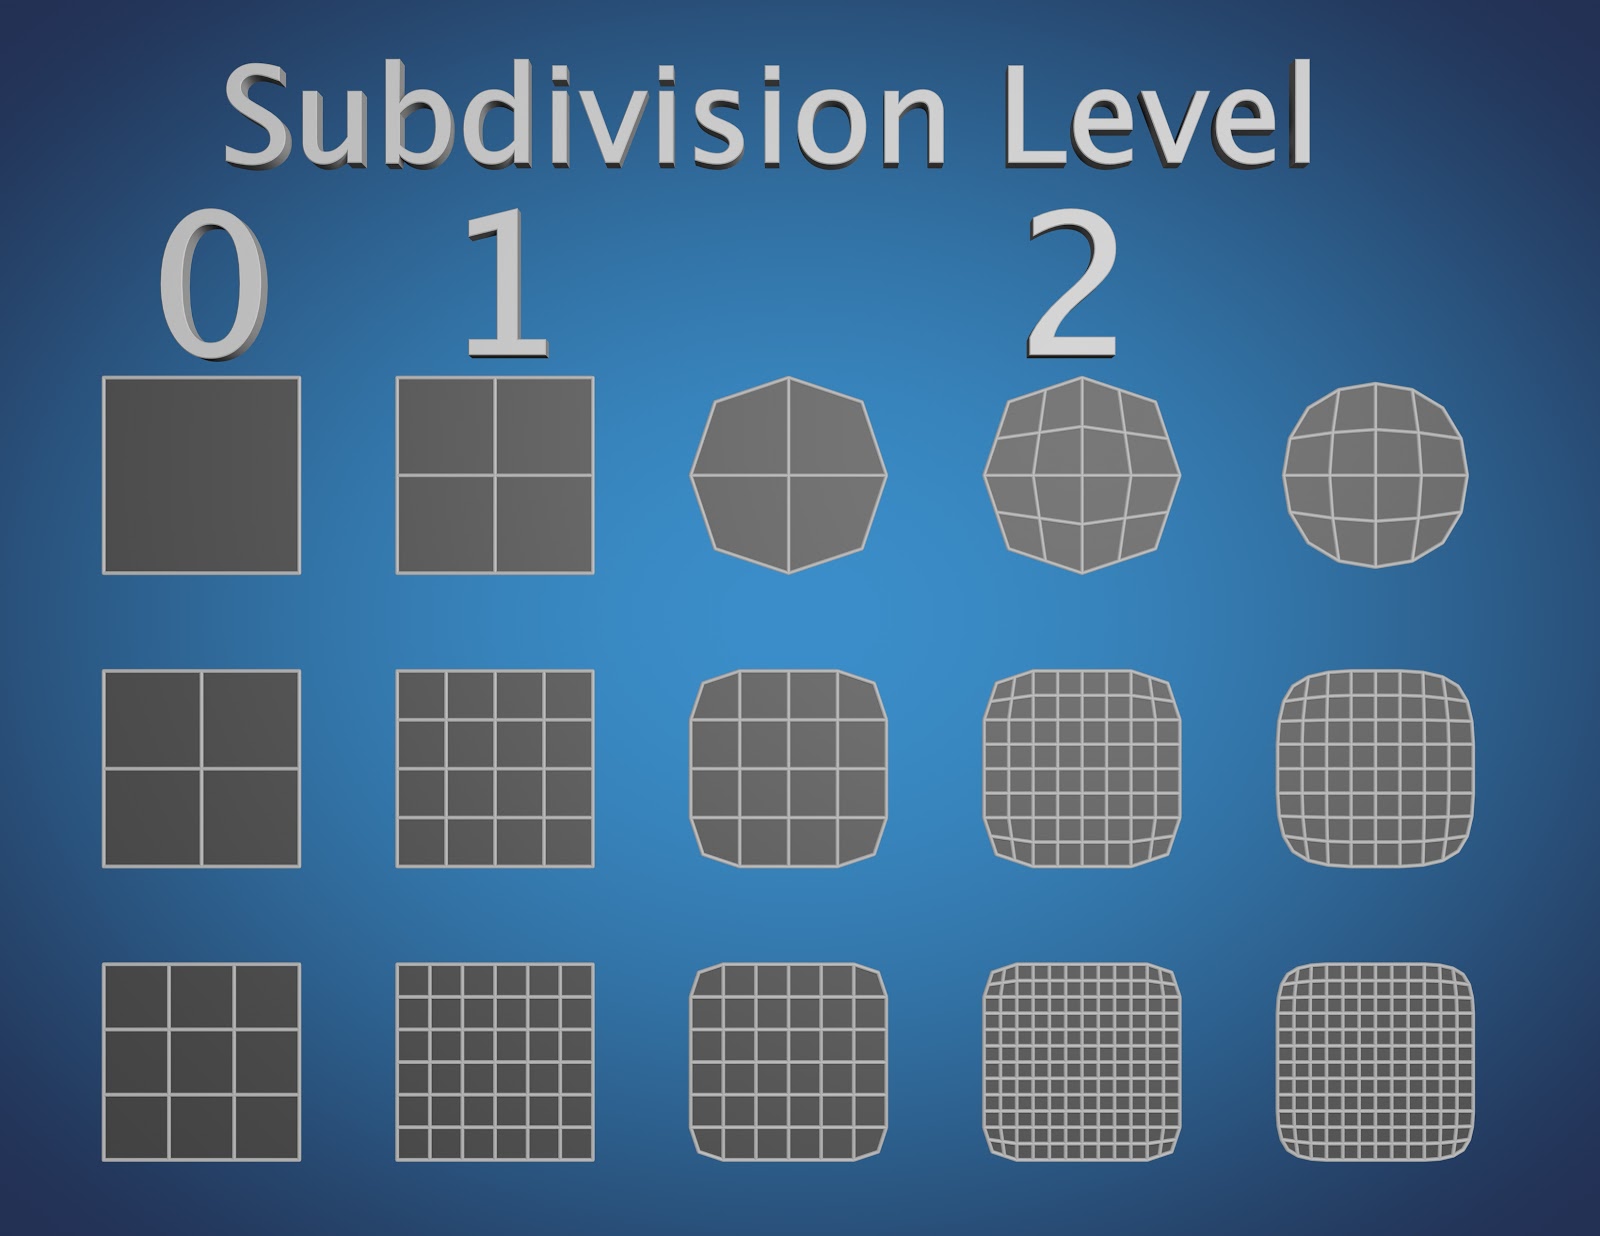 |
| Stages of subdivision. |
 |
| Common methods for (trying to) sharpen corners. |
 |
| Methods for sharpening edges. Some more successful than others. |
New C4D Plugin Programming Blog
 Some of the Cinema 4D programmers are now writing a Cinema 4D plugin programming blog in their personal time. It looks like a great resource for any aspiring (and current) plugin programmers.
C4D Programming is written by Frank Willeke, Yannick Puech, and Francesco Guazzi.
Thanks guys!
Friday, November 2, 2012
How to Make Your Own Puppets
The good times keep on rolling here at Nerding Off. Another flash-from-the-past for you, Jim Henson shows you how to create your very own puppets at home!
How Terry Gilliam Made the Animations for Monty Python
Ever wondered how Terry Gilliam created the hilarious animated interstitials for Monty Python's Flying Circus? Well, wonder no longer:
My takeaways:
My takeaways:
- The primary method is cut-out animation. Not unlike the early days of South Park.
- He got his images from magazines, historical sources, books, and some elements which were custom shot.
- Most elements require at least two pieces, one with just the moving element, and one with the moving element seamlessly painted out of the background.
- Embrace the limitations of the medium: motions should be quick, don't select elements that will force you do do a bunch of complex animation (wheels are better than legs).
- Photographs lend a dimensionality to what would otherwise be an incredibly flat medium.
- You can recolor BW photos using felt-tip pens.
- Use a loop of tape to pin down pieces.
- Use a piece of glass to flatten out the pieces and minimize shadows. Try to light from directly above using 2 lights. The higher the light the better (to mimimize shadows).
- Have fun!
Wednesday, October 31, 2012
How to Easily Transcribe Audio
After a bit of research I've discovered that for me, the best free audio transcription software is Express Scribe by NCH Software, you can download it here.
1. Optimize your playback hotkeys
To get the most out of your experience, I recommend the following hotkey settings (Options > System-Wide Hotkeys):

Having the key-commands so close at hand basically eliminates the need for a foot pedal.
2. Slow down the default playback speed
Also, when playing back your audio, set the playback speed to something like 50%:

3. Automate the time-stamping process
If it's important that you be able to time-stamp your audio, add the "Copy Time" command to your list of hotkeys (details here). This will automatically make a copy of the current timestamp, using the key commands I have listed above you would use "Ctrl + Num 0" followed by "Ctrl + V" to paste in the time stamp.
Also, to change the format of the pasted timestamp, I recommend the following settings:

1. Optimize your playback hotkeys
To get the most out of your experience, I recommend the following hotkey settings (Options > System-Wide Hotkeys):

Having the key-commands so close at hand basically eliminates the need for a foot pedal.
2. Slow down the default playback speed
Also, when playing back your audio, set the playback speed to something like 50%:
3. Automate the time-stamping process
If it's important that you be able to time-stamp your audio, add the "Copy Time" command to your list of hotkeys (details here). This will automatically make a copy of the current timestamp, using the key commands I have listed above you would use "Ctrl + Num 0" followed by "Ctrl + V" to paste in the time stamp.
Also, to change the format of the pasted timestamp, I recommend the following settings:

Note, you can't see it, but after the suffix brace is a space " ".
This makes the finished time code looks like this:
[00:01:23.4] He said this.
Notes for the software developer:
My primary niggle with the program is that I can't use the same command for play and stop. If that was possible, I'd recommend "Ctrl+Space" as the hotkey so that your hands never have to leave the home position.
Also, it would be great if the software could combine "Copy Time" and "Paste" into a single command, but for a free software this is already worlds better than trying to transcribe in MS Word.
Monday, October 29, 2012
Experiment #2: Isometric Cubism
A quick experiment in digital cubism. Can a subject be defined simultaneously from three angles? Does this reveal or obscure form?
Experiment #2: Isometric Photo-Based Cubism from Donovan Keith on Vimeo.
Friday, October 26, 2012
Experiment #01: Cosmos
In an effort to keep up my chops in between projects I've programmed a random design assignment generator. Today's assignment was "Create a design using only circles."
I initially created the following in Illustrator:

Then translated the concept to C4D and eventually After Effects:

Here's the finished animation:
Experiment #01: Cosmos from Donovan Keith on Vimeo.
Tuesday, October 2, 2012
CG Lighting Tutorials and Resources
This post mainly exists so that I can compile all of the lighting resources I find into one meaningful location, but hopefully it will be of some use to you as well.
Richard On, whose work really speaks for itself, has compiled a four-part series on lighting:
mister3d has compiled a lively discussion from the CG Talk Lighting & Shaders forum into a useful primer on the science of CG with a focus on the physics of light and how it is typically represented by 3D programs.
Jeremy Birn who currently works as a lighting TD at Pixar has written the book on CG Lighting: "Digital Lighting and Rendering".
Kodak has written a newsletter that is a good introduction to the basics of lighting for film.
Articles & Interviews with working professionals:
Key Tips for Lighting by Cosku Turhan (Sony Pictures Imageworks)
New Trends in CG Lighting Matthias Menz (Weta)
Friday, September 14, 2012
Syncing Multiple Copies of Cinema 4D (Windows)
If you're an animator working in the modern era, you're probably running Cinema 4D in at least three places.

- Your desktop at work.
- Your desktop at home.
- Your laptop.
Add to this that on any of these machines you may be running the current version of Cinema and the version or two before that (for legacy projects/clients), and you've pretty much guaranteed that any time-saving scripts, plugins, layouts, or libraries won't be where you need them when you need them.
Thankfully, there's a solution, that would probably have been obvious to any hardcore unix hacker (which I'm not, nor I assume are you): symbolic links.
A symbolic link is basically a shortcut from one folder or file to another, except that your file browser and any programs you're running can treat them like real files.
The basic solution works like this.

The three lower arrows each represent a symbolic link to a "C4DLibrary" folder in your DropBox (or GoogleDrive, or iCloud, etc) account. Dropbox will handle the work of keeping your files synced across computers, and whenever you add a new plugin/layout, etc, it will get saved to the C4DLibrary folder in your dropbox.
Instructions
Note: the following instructions apply only to a Windows machine. These instructions also should only be used with the same version number of C4D, cross-version linking can lead to strange results - you'll need to manually link sub-folders.
- In Dropbox create a folder called "C4DSync" (This is the "C4D Library" folder from the above illustration)
- Download "Directory Linker" from: http://dirlinker.codeplex.com/
- Open Cinema 4D on the most readily accessible computer.
- Click on Edit->Preferences
- From the preferences window click on the "Open Preferences Folder" button. This will open a windows explorer dialog.
- In the path bar at the top (the one that looks like Username->AppData->Roaming->MAXON->...), click to the far right. This will convert the path to a file path that should look something like:
C:\Users\Username\AppData\Roaming\MAXON\CINEMA 4D R13 - Copy this text.
- Run the "Directory Linker" application you downloaded earlier.
- In the "Link Location:" field paste the filepath you copied in step 6.
- In the "Link To:" field browse to the "C4DSync" directory you created in dropbox. It'll probably look something like "C:\Users\Username\Dropbox\Library\C4DSync"
- Ensure that "Copy contents to target then delete it" is active.
- Click on the Go! button.
Congratulations, your primary installation of Cinema 4D is now saving all preferences and plugins to your dropbox folder. Now just repeat steps 2-12 for all other C4D installations.
WARNING: Please make backups of your preferences folders before doing this, especially if you have any important projects in there. I've yet to test this with C4D running simultaneously in multiple locations, but I can imagine that leading to some bad juju, so please test (and report back) before using this in production. Also, if your plugins are serial-linked this will lead to some issues as well unless all versions of C4D are sharing the same serial number.
References
Thanks go to the following resources for getting me to a place where I was able to write this post:
Tuesday, September 11, 2012
C4D Architectural Visualization Resources
With any luck, I'll be doing some more architectural visualization work soon. Here's a list of resources I came up with while doing research for a project. If I've missed anything, please leave a comment.
Tutorials
C4D Specific
- Digital Tutors
- Learn to Visualize: Architectural Concepts
- Modeling Interiors in Cinema 4D
- Rendering Interiors in Cinema 4D
- C4D Exchange
- Modeling an Office Building in C4D: Alternatively, a lower-quality free version can be downloaded here.
- Modeling a house by Dr. Pavel Zoch
- Envy Studios
- C4D V-Ray Exteriors - From the Ground Up
- C4D V-Ray Interiors - From the Ground Up
- C4D Advanced Render Interiors - From the Ground Up
- Claude Kongs
- Tutorials: 3D architectural visualization – the key elements (3min)
- 3D Arch-renderings Meet The "Film Look" in After Effects CS5: a brief overview of a plugin-free After Effects workflow for creating architectural visualizations.
- How to make a good architectural visualization movie
- Directing CG Architectural Movies: Unfortunately, this is just a teaser trailer for an as yet unreleased tutorial series. But if it ever gets released, it looks like it will be a must-watch.
- Cineversity:
- ArchC4D: A 90min introduction to architectural visualization in C4D. Available for free, but if you like what you see, you might want to kick a few bucks to the author.
General Tutorials
- Arch Viz Making of Tutorials: A pinterest board created by Ronen Bekerman. Seems like a pretty good starting place. Not necessarily C4D specific.
- Of particular interest to me was his approach to Modeling a large complex onto a photo of aplot of land.
- CG Architect.com: This looks to be a great resources. They have quite a few making-of articles up that show images of finished works in various states of production.
Recommended Reading
- CG Talk Forums
- Arch Viz Workflow: It seems that most people use some combination of VectorWorks or Sketchup to work with DWG files from the architects, and then bring those into C4D using various plugins. VW seems to be the preffered option because of the quality of its exchange plugin.
- C4D Cafe Forums
- Archviz Workflow / Software Question: A few posts on the subject. It seems that at least some people prefer ArchiCAD over SketchUp for architectural work. Also, for 2D work, you can import a .dwg into illustrator and then export an AI file for use in cinema. For 3D a .dxf file can be used (despite often poor results).
Plugins / Model Packs
- Bridge Maker Preset: Create a (not sure how useful it is) bridge.
- Win4Doors + Stairs 4D: Polygon modeling plugins that allow for the easy generation of stairs and windows.
- Win Gen: A parametric window object.
- Window Rig: A really extensive free window rig.
Tools
- Google SketchUp: A free architectural modeling plugin.
- Sketch 4D: Allows you to download and open Google Warehouse files directly into C4D. Also allows you to open sketchup files in C4D so that you can use SketchUp Free instead of SketchUp Pro.
- Google SketchUp 8 Essential Training by George Maestri for Lynda.com
- VRAY for C4D: A popular third-party renderer for architecture visualization work. While I'm a big proponent of using built-in tools where possible, the renders coming out of VRAY really seem to be a cut above C4D's built-in renderer for this sort of work.
- ArchiCAD: A 3D CAD modeling program tailored to architecture work.
- Tools4D Texture Remapping Kit: A great tool for taking existing photographs and translating them into reusable tiling textures. Great for grasses, building fronts, etc.
Tips
- Adopt a standard scale for all of your models, this way you can easily import all of your files from different projects into the file for your latest gig.
Areas for Further Research
- Model packs
- Texture packs
- Go through the above tutorials and resources and see if any best practices emerge. If so, codify them and write another post.
- Helpful plugins
Monday, August 20, 2012
Where to Find C4D Jobs
The following are free (to applicants) job listing services likely to have Cinema 4D gigs.
- Craigslist.com Gigs
- Craigslist.com Jobs
- C4D Cafe Job Line
- CG Society Job Board
- Motionographer.com Job Board
- Mograph.net Job Board
- Mandy.com Animation Jobs
Useful search terms:
- Cinema 4D
- C4D
- Maxon
- AE
- Mograph
- Motion Graphics
- Animator
- Animation
- Titles
I recommend setting up RSS feeds for each of these services so whenever you're in-between gigs you can quickly get a sense of what's out there.
Have I missed any resources? If so, please leave a comment.
Thursday, August 9, 2012
C4D Reference / Tutorial Resources
This is a partial list of C4D resources I use regularly. I have bolded those that will probably be of the greatest benefit to you. If you don't know where to start as a C4D animator, you could do worse than this:
- Compete in the 5-Second projects. Dedicate time to making a project you're proud of. Actually trying to make something is far more instructive than a manual could ever be.
- If you run into a problem, someone else probably has too and you'll be able to find an answer on the CG Talk forums.
- To stay current in all the latest and greatest in C4D, subscribe to C4D weekly. Read the whole newsletter and at least one article a week. If that's overwhelming, do it once every other week.
- Once you've put together a reel using your best 5 second projects, go to DMALA and meet up with some other C4D and AE artists in person. Bring cards, eat free pizza, get work.
- Whatever you do: create *something* on a regular basis.
- CG Talk Forums: http://forums.cgsociety.org/forumdisplay.php?f=47
- Greyscale Gorilla: http://greyscalegorilla.com/
- 5 Second Projects: http://greyscalegorilla.com/blog/category/fivesecondprojects/
- C4D Cafe: http://www.c4dcafe.com/ipb/
- Creative Cow Forums: http://forums.creativecow.net/cinema4d (Beginner Friendly)
- C4D Weekly: http://www.c4dweekly.com/
- Cineversity.com: http://www.cineversity.com/
- C4D Manual: right-clicking on any parameter and choosing "Show Help"
- C4D Tutorials: Help->Show Tutorials
- Making it Look Great w Tim Clapham: http://www.motionworks.com.au/making-it-look-great-7/
- Tim Clapham's Blog: http://www.helloluxx.com/
- My Youtube Channel: http://www.youtube.com/user/nerdingoff
- C4D Live: http://c4dlive.com/
- DMALA: http://www.dmala.org/
- Vertex Pusher: I haven't had a chance to watch these yet, but apparently they're some of the best in the business for modeling techniques.
Friday, July 20, 2012
Lecture Scribe - Easily Record Digital Whiteboard Lectures
If you have any interest in creating a low-fi whiteboard lecture that will be easy to post and share with students, may I recommend Lecture Scribe?
http://www.cs.clemson.edu/~bcdean/lscribe/
It allows you to record whiteboard lectures on a PC using a wacom tablet. The final output are extremely light-weight flash files. This certainly isn't the prettiest program in the world, but it just might help your students better understand what you're trying to explain.
Originally discovered on The Rapid E-Learning Blog.
Tuesday, July 17, 2012
Showing Key Presses During Video Tutorials
Because I've been teaching software to beginners for so long, I tend to favor a highly visual working style. I never use the keyboard command, I always go to the most obvious icon or pull down and use that. Even when navigating in the C4D viewport, I'll find myself going to the icons in the upper-right hand corner. Not because it's faster, but because my students will be more able to follow along while watching. Unfortunately, this isn't the most efficient way of working. I've been trying to find a method of showing my key-presses on screen while I make them for a while now, with no luck. Enter "key-mon" an open source tool for displaying keys on-screen as you press them:

Pretty nifty. Unfortunately I've yet to get it working on my OSX or Windows Installation. Once I do, I'll give you full instructions.

Pretty nifty. Unfortunately I've yet to get it working on my OSX or Windows Installation. Once I do, I'll give you full instructions.
Friday, July 13, 2012
L-System Resources
While researching methods for semi-accurately modeling neurons and neural networks, L-Systems came up repeatedly. L-Systems allow you to procedurally model fractals and complex branching structures. Cinema 4D has an implementation of L-Systems found in the MoSpline object's Turtle Mode.
In my research into L-Systems I came upon a number of interesting resources that might be of use to other animators:
The University of Calgary's research into Algorithmic Botany has a number of papers describing ways of modeling different organic systems. But the stand-out is TreeSketch, an astounding free app for interactively drawing trees created by Steven Longay, Adam Runions, Frédéric Boudon, and Przemyslaw Prusinkiewicz.
I mean, look at this video:
TreeSketch 2.0 - Promo Video from Steven Longay on Vimeo.
The ease with which they are able to define complex 3D forms is really inspiring. Their research paper cite's the Teddy system, a really cool sketch-based modeling system that I first saw at SIGGRAPH about a decade ago.
The future of 3D is in tools that allow us to model the world simply and expressively. Heck, that's the future of computing in general: let the tech serve the aims of the users, not the users serve the structure of the technology.
But I digress, here are some useful links about L-Systems:
The Algorithmic Beauty of Plants by Przemyslaw Prusinkiewicz and Aristid Lindemayer: The 'L' in L-Systems comes from the name Lindemayer. This is the definitive text on L-Systems.
Wikipedia's L-System Article gives a solid overview of L-Systems and their uses.
Selcuk Ergen's personal research into L-Systems provides an astoundingly easy to understand introduction to l-systems. Beginners should probably start here.
For an introduction to the Turtle mode in C4D:
Rick Barrett has a basic tutorial on how to move your turtle available on Cineversity.
Colin Sebestyen shows you how to start moving your turtle in 3D in his NAB demonstration, also available on Cineversity.
In addition to MoSpline's Turtle Mode, there a couple of other implementations of L-Systems for Cinema 4D;
X-Frog - A set of procedural objects that allow you to easily model branching, phyllotaxis, and more without needing to program in the Turtle Graphics language. Also, there are pretty extensive libraries of realistic plant models you can download.
DPIT Plants - Another set of procedural objects for modeling plants. I'm honestly not sure what distinguishes this from X-Frog.
Areas for further research:
- Look into the Houdini help files for general l-system information.
Thursday, April 12, 2012
Installing Mercurial on Mac OSX 10.5.8
Most of the builds of source version control system Mercurial are for Mac OS 10.6 and above, but with a bit of internet searching I was able to find a system with a GUI that works on Mac OS 10.5.
- Download a 10.5 compatible install of Mercurial.
- Go to: http://mercurial.berkwood.com/
- Search the page for the text "10.5"
- Download the install package for the most recent version of Mercurial that says it is 10.5 compatible. For me that was 2.0.2.
- Install the package.
- Download and install Murky a GUI for Mercurial.
- Go to: https://bitbucket.org/snej/murky/wiki/Home
- Download the latest release.
- Copy the application into your applications folder.
- Add the application to your dock.
- Run Murky and create a local clone of an open source project you want to work with.
Wednesday, April 11, 2012
Sweep Splines 0.2 - An Open Source C4D Plugin
I'd like to announce that Sweep Splines v 0.2 is available for immediate download. It's a tool that allows you to quickly and easily sweep all selected splines with a square spline.
You can watch a video introduction here:
I initially wrote in response to a post on C4D Cafe. I'm releasing it to the world so that aspiring C4D python developers can take a look at how to create a simple plugin.
Disclaimer:
At this point, I have no plans to update this plugin, so please use at your own risk.
Ira Glass on Persistence
This quotation has more than made the rounds by now, but I find it encouraging and a regular point of reflection, so I'm sharing it:
“Nobody tells this to people who are beginners, I wish someone told me. All of us who do creative work, we get into it because we have good taste. But there is this gap. For the first couple years you make stuff, it’s just not that good. It’s trying to be good, it has potential, but it’s not. But your taste, the thing that got you into the game, is still killer. And your taste is why your work disappoints you. A lot of people never get past this phase, they quit. Most people I know who do interesting, creative work went through years of this. We know our work doesn’t have this special thing that we want it to have. We all go through this. And if you are just starting out or you are still in this phase, you gotta know its normal and the most important thing you can do is do a lot of work. Put yourself on a deadline so that every week you will finish one story. It is only by going through a volume of work that you will close that gap, and your work will be as good as your ambitions. And I took longer to figure out how to do this than anyone I’ve ever met. It’s gonna take awhile. It’s normal to take awhile. You’ve just gotta fight your way through.” --Ira Glass of This American LifeKeep fighting, even if you're a pacifist.
Friday, April 6, 2012
Plugin Development Guidelines for a Seamless User Experience
I've been evaluating a lot of utility plugins for Cinema 4D, based on my experiences, here are a few suggestions on creating a better user-experience. In no particular order:
- As much as possible, make your tool fit seamlessly into your user's existing workflow.
- Follow the visual conventions of the application:
- Make your icons looks as much like native icons as possible. No-one likes the bolt-on appearance of most plugin icons.
- Gray out your icon if your tool isn't appropriate to a given mode.
- Ensure that your plugin is undo friendly.
- Choose a simple descriptive name, it should feel like just another command.
- Write a mouse-over help string, include any useful key-commands
- It's better to make simpler discreet tools that don't require user-interaction than one giant tool with a million options.
- Fully document your tool: written docs, video tutorials, and multiple example files.
Friday, March 23, 2012
Real World Lighting Tips from Nick Campbell
Nick Campbell gave a great talk on lighting.
Here are my takeaways:
Here are my takeaways:
- Fuzzy shadows indicate small scale
- Sharp shadows indicate large scale
- Mimic the real-world as much as possible in terms of light placement and size
- Play with different color temperatures for your lights - pure-white light rarely happens in the real world.
- GI leads to more realistic lighting behavior
Friday, February 17, 2012
C4D Python Matrix Basics & Helper Functions
I seem to forget the basics of working with matrices in C4D immediately after I use them. Here are some resources and helper functions:
Maxon's How to Use Matrices
C4D Python SDK Matrix Reference
Some PSR helper functions written by Maxon with additions for point manipulation by me
Maxon's How to Use Matrices
C4D Python SDK Matrix Reference
Some PSR helper functions written by Maxon with additions for point manipulation by me
############## HIERARCHY HELPERS ######################
def GetGlobalPosition(obj):
    """
    Returns the global position of obj
    """
    return obj.GetMg().off

def GetGlobalRotation(obj):
    """
    Returns the global rotation of obj
    """
    return utils.MatrixToHPB(obj.GetMg())

def GetGlobalScale(obj):
    """
    Returns the global scale of obj
    """
    m = obj.GetMg()
    return c4d.Vector(  m.v1.GetLength(),
                        m.v2.GetLength(),
                        m.v3.GetLength())

def SetGlobalPosition(obj, pos):
    """
    Sets the global position of obj to pos
    """
    m = obj.GetMg()
    m.off = pos
    obj.SetMg(m)

def SetGlobalRotation(obj, rot):
    """
    Sets the global rotation of obj to rot
    Please remember, CINEMA 4D handles rotation in radians.

    Example for H=10, P=20, B=30:

    import c4d
    from c4d import utils
    #...
    hpb = c4d.Vector(utils.Rad(10), utils.Rad(20), utils.Rad(30))
    SetGlobalRotation(obj, hpb) #object's rotation is 10, 20, 30
    """
    m = obj.GetMg()
    pos = m.off
    scale = c4d.Vector( m.v1.GetLength(),
                        m.v2.GetLength(),
                        m.v3.GetLength())

    m = utils.HPBToMatrix(rot)

    m.off = pos
    m.v1 = m.v1.GetNormalized() * scale.x
    m.v2 = m.v2.GetNormalized() * scale.y
    m.v3 = m.v3.GetNormalized() * scale.z

    obj.SetMg(m)

def SetGlobalScale(obj, scale):
    """
    Sets the global scale of obj to scale
    """
    m = obj.GetMg()

    m.v1 = m.v1.GetNormalized() * scale.x
    m.v2 = m.v2.GetNormalized() * scale.y
    m.v3 = m.v3.GetNormalized() * scale.z

    obj.SetMg(m)

def LocalToGlobal(obj, local_pos):
    """
    Returns a point in local coordinate in global space.
    """
    obj_mg = obj.GetMg()
    return obj_mg * local_pos

def GlobalToLocal(obj, global_pos):
    """
    Returns a point in global coordinate in local space.
    """
    obj_mg = obj.GetMg()
    return ~obj_mg * global_pos

def SetPointGlobal(point_object, point_index, global_pos):
    """
    Sets the global position of point_object's point to global_pos
    """
    p_local_pos = GlobalToLocal(point_object, global_pos)

    #Set Point
    point_object.SetPoint(point_index, p_local_pos)

    #Tell C4D the spline has changed.
point_object.Message(c4d.MSG_UPDATE)
#Move this line to the end of your loop if you're call this command a lot.
def SetPointGlobalVirtual(point_object, parent, point_index, global_pos):
    """
    Sets the global position of a virtual point_object's point to global_pos
Most useful when setting the points of a spline created in a Python Generator""" p_local_pos = GlobalToLocal(parent, global_pos) #Set Point point_object.SetPoint(point_index, p_local_pos)
#Tell C4D the spline has changed.point_object.Message(c4d.MSG_UPDATE) #Move this line to the end of your loop if you're call this command a lot.
def GetPointGlobal(point_object, point_index):
    """
    Return the position of a point in Global Space
    """
    ppos = point_object.GetPoint(point_index) #Get the point in local coords
    return LocalToGlobal(point_object, ppos) #Return the point in global space

#######################################################
Subscribe to:
Posts (Atom)